Thursday, August 23, 2007

iPhone recessed headphone jack DIY hack

Yes, that's right, this "hack" enables you to use your iPhone the way YOU want to, not the way Apple wants you to. They want you to use their stupid headphones or an adapter, and YOU want to use your own.

What does it even mean to hack a headphone jack, does that even make sense? I think of hacking as a way of making an item/object/system/whatever do something which it isn't designed to do.

Which brings me to the fact that the iPhone has a recessed headphone jack, meaning that unless you happen to have a pair of headphones with an incredibly small connector, it won't quite fit right into the iPhone. Companies like Belkin try to sell you an "adapter" that fits into the recessed jack for like 10$, but this is a bunch of bull, its a direct feed through. We can make one ourselves for a few bucks and about 2 minutes of our time. Get a hold of the following:
  1. A 3.5mm M/F audio cable if you want to plug in other headphones. If you are trying to plug the iPhone into another device that accepts 3.5mm input, use a M/M cable. I would suggest Monoprice, but you should get a good look at the cable before you buy, so try your local Radioshack if you are unsure. More on this below.
  2. A sharp knife (anything that uses a razor, like a utility knife or box cutter, etc).
I had these both laying around the house, and I suspect many others do too. If you're buying the cable, make sure you get a good look at it, particularly near the base of the metal jack. There is always a little bit of a metal disk at the base, and you have to make sure this is smaller than the recession in your iPhone. In my experience, most cables have one small enough, but try to look at to make sure anyway.

To apply the hack, simply whittle away some of the plastic jacket around the jack itself. I would recommend using angled strokes starting at the metal disk's edge, then cut a wedge off downward. Do this all the way around, so your plastic jacket is now more of a cone than a cylinder. Don't give into Apple's BS, DIY instead.

Return of the Hack
This is really just another option, but "return of the hack" sounded so much cooler :-) Get a hold of an old pair of iPod earbuds. I happen to have a pair I stepped on that don't work. It's little connector is small enough, so we're going to use it to make a Frankencable. If you have ANY experience splicing your own cables, this should be cake, but I'll walk you through it anyway.
  1. Snip snip. That's right, cut the cable just anywhere between the jack and the earphones.
  2. Keep the side with the jack and strip away the insulation, about two inches worth. Your teeth work well for this, or just get crafty with a utility knife (or god forbid wire strippers).
  3. There should be three little wires in here, strip away about an inch on each one of these.
  4. Repeat steps one through three on your good headphones, but cut closer to the jack this time and work on the headphone side instead of the jack side. See where this is going?
  5. You should have three bare wires sticking out of both parts. Now all we do is twist them together in matching pairs, and electrical tape each splice. Now electrical tape all three together, et voila.
If you wanted to (and aren't afraid to try) you could apply some solder to the twisted splices, and maybe use some shrink tubing instead of electrical tape. This makes for the best solution, but the one given above is quicker. I'll leave the details up to you. Enjoy.

Saturday, August 11, 2007

1080p out of a Macbook

You have a shiny new Macbook, and you want to try it out with that 1080p native TV you have. Chances are you have an HDMI input on your TV, and hopefully one that also accepts external audio. This is a little start to finish guide on how to get it all hooked up and working.

The Hardware
You'll need the following:
  1. Apple mini-DVI to DVI converter dongle
  2. DVI to HDMI cable
  3. 3.5mm audio to RCA cable
If you already have an HDMI cable laying around, you can instead get a DVI-HDMI converter for step two. Luckily DVI and HDMI use the same kind of TMDS video signals/protocol just with different connectors, so this is a nice simple conversion of pinout with the signal not even being altered. And its all digital, so don't too much worry about signal loss through all these connectors.

A Problem Arises...
This covers the hardware side. Run the mini-DVI to DVI from your Macbook, plug in the DVI-HDMI cable you have/made into this, then plug the other end into the TV. If you want audio, use the RCA cables from your audio out to the HDMI audio in. You'd think you could plug it into a 1920x1080 native TV and it would "just work" right? Well it doesn't:


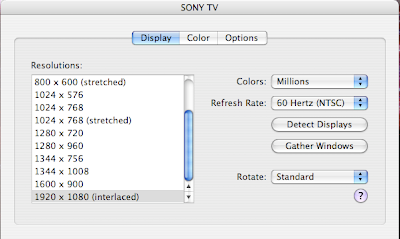
As you can see, the maximum resolution listed in your display preferences is "1920 X 1080 (interlaced)". There is apparently a little bug in OS X Leopard Tiger that makes it output 1080i, and no matter how you fiddle with your Sytem Preferences and Display settings, it won't give you 1080p. (Updated 9-26-2008; I mistakenly said Leopard before, I meant Tiger. I think Leopard fixed this issue, not sure though)

The Workaround
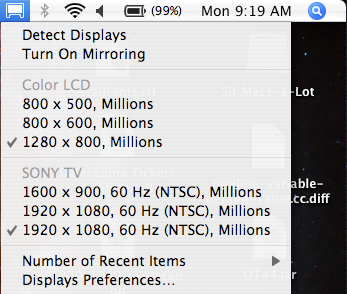
Despite this bug, there is another related bug that makes 1080p work. First, go to System Preferences -> Displays, and check "Show displays in menu bar".
Before
After

You might or might not have already had this enabled. Then, go to the display settings, and set the external monitor to something else like 1600 x 900, then back to 1920x1080 (interlaced). This has the effect of adding the 1920 x 1080 resolution to your list of recently used resolutions. Note overscan is in this set of menus too, and depending on your TV, you might have to turn it on or off. The TV needs to be set in a 1-to-1 pixel mode too. This is called "Full-pixel Mode" by Sony, it will vary by manufacturer...go through the TV menus to find these settings.

So now check the top Display menu you just enabled: it should have two options for 1920x1080 on the external monitor with no difference between the two visible in this menu:


There is however, a difference: one is progressive, the other is interlaced. All you have to do is try the other one, and watch your TV to see when it says it is receiving a 1080p signal. Bingo!
Update 10-15-2007: Increase the number of recent items in this menu if you still don't see the extra item. Thanks to Kristofer from the comments for pointing this out.

Caveats
You might notice some low framerates if you try 1080p trailers and the like. This is because the Macbook (with its RAM sharing Intel GMA 950 graphics chipset) may not be the best powerhouse to deliver full framerate 1080p, so I'd reccommend dual booting into Windows. Why? Because for some reason, according to Wikipedia, Windows will share up to 224MB of your system RAM for graphics purposes, while OS X will only steal 64MB. So if you have the RAM for it, Windows will do a better playing back some 1080p trailers and whatnot. Enjoy your new monitor :-)

Friday, August 10, 2007

Multiple Monitors in Linux

I had been using Red Hat Enterprise Linux 4 at work for about 6 months. It was truthfully a pain in the ass to use because the package management is based around rpm and a Red Hat tool called up2date. The default repositories up2date looks at are pitifully lacking substance. I'd found a useful repository of RPMs, but I found changing a bunch of .conf files to point to the new repo was still painful. Then recently my configuration tools like up2date, the screen settings, and the print settings wouldn't launch. For those of you in the Windows world, all of my "Control Panels" were unavailable. So, my desire for a nice GUI update/package manager combined with the non working control panels lead to one conclusion: scrap RHEL4, install Ubuntu. I decided to add another graphics card and monitor to my setup at this point too, hoping the Ubuntu install would pickup on the hardware and automagically set up multiple monitors. Unfortunately I was wrong.

Quick and Dirty secrets of xorg.conf
My Ubuntu install went off without a hitch, but the second monitor never came on. To be clear, I have a main AGP graphics card, and a much older crappy PCI one. They both connect to their monitors (two of the same model of Dell LCD) via VGA. It turns out the problem is with the X server, which is the thing that is the basis of every GUI on Linux, be it GNOME, KDE, Xfce, whatever. Configuring X is the first step in getting multiple monitors with the proper resolutions, color depths, etc. There is this file /etc/X11/xorg.conf that does the magic. If you have the right configuration settings here, you can make wondrous things happen. The first thing I thought was "Hey, Ubuntu probably has a really nice GUI multiple monitor configuration!". Turns out it doesn't so that means that I'd have to modify xorg.conf by hand. At first I tried setting up something called Xinerama using a forum post I found. No luck with this, even though I am convinced I did things exactly like they said. After digging around some more, I came up with the following, and it pretty much works. Where the Debian configuration of X failed to find and set up the second monitor, X's own configuration of itself does not. Try the following:

  1. Reboot into a failsafe shell/single user mode. This keeps X and your desktop environment from running. You need to do this to configure X (can't configure itself while its running). Failsafe mode usually involves stopping your boot loader by pressing some buttons during bootup, then picking the appropriate option. Note that you'll be root, so be careful.
  2. Make sure all graphics cards and monitors you want are hooked up and ready to go.
  3. Do a "X -configure". This gets you a local version of a configuration file called xorg.conf.new
  4. Now try it out: "X -config /root/xorg.conf.new". You should be greeted with some test patterns on both screens! The mouse will move back and forth across both screens too. Simple as pie.
  5. Now quit X: ctrl+alt+backspace. If you didn't get the test patterns...abandon all hope, I know not what else to do.
  6. Backup your working xorg.conf just in case: "cp /etc/X11/xorg.conf /etc/X11/xorg.conf.working"
  7. Copy over the new config file to where X expects its configuration file "cp xorg.conf.new /etc/X11/xorg.conf"
  8. Do a "reboot"
There you have it, you should have two desktops! If it didn't work, you'll get some scary output...no fear if this happens. You'll be in a root shell, so just replace the file with your backup ("cp /etc/X11/xorg.conf.working /etc/X11/xorg.conf") then "reboot".

If it worked, this gets you a fresh, working start to editing xorg.conf. The two Desktops are still distinct and have no way of moving windows between them at this point, so one last thing to enable that is to open up your xorg.conf ("sudo gedit /etc/X11/xorg.conf") and add the following line:
Option "Xinerama" "true"
To the "ServerLayout" section. Save the file, then do a ctrl+alt+backspace to try it out! Remember if you screw things up, just go back to the backed up file you have. You might need to edit the "Screen" section some to support the display modes you want, and maybe comment (#) out the HorizSync and VertRefresh parts of the "Monitor" section. You can see your backed up copy of xorg.conf for the formatting of the display modes.

Final Thoughts
It's not Windows. It's not easy. It's kind of a pain to set up. Oh Ubuntu, why don't you make a GUI tool to make this configuration nice and easy, and why oh why don't you include it as a System->Preference option? I guess they're working on it for 7.10. But I hope I have saved you some of the trouble I came across when trying to configure multiple monitors. Happy editing!

Wednesday, August 8, 2007

Thoughts on some HBO HD broadcasts : 810i ?

I was watching HBO HD the other day, and Flight of the Conchords came on. I noticed that although this was a 1080i broadcast, and the aspect ratio of the show appeared to be a regular 16:9, the whole show was windowboxed top to bottom, left to right:I know this is Entourage (which doesn't display like this), but you get the idea. The gray colors are for emphasis, you most likely see black all the way around. You might have noticed the same thing about HBO HD commercials too. My Sony TV has a "zoom" feature that zooms in on a 16:9 shaped box right in the middle of the screen, so that the letterboxing is perfectly offset and I have fullscreen. This got me to thinking: what effective resolution am I getting out of this ?

Some Quick Calculations
The whole frame is 1920x1080. Its pretty clear that the lighter gray box is a 4:3 box maximally fitting the larger box. The height is 1080, and if it is in a 4:3 proportion, then the width of the smaller box is 1080/3 * 4 = 1440. So we're down to 1440x1080. The content itself is 16:9, maximally fitting in THIS box. So if the width of the content is 1440, the height is 1440/16 * 9 = 810. So we're finally down to 1440x810.

Keeping in mind that the original broadcast was interlaced, we could easily call this resolution 810i (even though this isn't a broadcast standard). So when I use my TV's zoom/scaling feature, what I'm seeing is broadcast 810i. Pretty interesting...companies like HBO probably use this little shortcut to get away with putting out a broadcast comparable in quality to 720p, while saving on bandwidth over a 1080i channel.

Conclusion
Who knows, its just a random thought I had. Feel free to comment with your thoughts...

Monday, August 6, 2007

uPnP server for PS3

This is just a brief roundup of what I have found, and what has worked for me for streaming to my PS3.

The XP side of things
I've had luck with the following:
http://www.microsoft.com/windows/windowsmedia/devices/wmconnect/default.aspx
I personally don't trust WMP11, I use WMP10, so I had to find the standalone version of Windows Media Connect that works with WMP10. Some googling did the trick. Note that Hi-def program stream stutters over 802.11 connection I am using.

On the Mac side of things
I found this:
http://www.applesource.com.au/how-to/how-to-stream-media-to-a-ps3-from-a-mac/210/
This basically is how to setup the FOSS package called Mediatomb for use on your Mac. If you already use the Fink package management system on your Mac, this is a lot easier. If not, this still walks you through.

Sorry for the short post, but I figure this will help some people out.

Friday, August 3, 2007

The Truth about Upconverting DVD Players

HD and related technologies aren't that well understood by the general public. We've all seen the hype about "true HD" displays and about "upconverting/HD compatible" DVD players, and not many people care about or understand what these things mean to their viewing experience. I had a friend recommend that I get a 1080i compatible DVD player instead of getting BD or HD-DVD right now while I wait out the format wars. He claimed his DVD picture was as good as HDTV. I've read advice that says that for fixed panel displays, upconverting DVD players match the native pixel count of the display, and thus provide a better picture. I'm here to say this:
all of the above is bull. Whether we're talking about interlaced vs progressive, upscaling DVD or not, its all fancy marketing terms to get you to think you can get a better picture. The truth is, both of these rely on real-time interpolation, and its a question of which device has the best algorithm.

What is interpolation?
It is any method of guessing at information you don't have. For example, we all know that an interlaced signal shows you all the even lines of one frame, and then all the odd lines of the next. For a CRT, the phosphorescence lifetime (the time it stays bright) of the pixel plus the phenomenon of human visual perception called the persistence of vision effectively blur the picture to where we don't notice we are seeing half the data for any given frame. But for any fixed resolution panel display (LCD, PDP) this wouldn't be the case. These each have a native resolution (usually 1920x1080 or 1280x720 pixels), and what you see on the screen is in this resolution, ALWAYS. For example, I have a 1920x1080 display. When I view broadcast 1080i HD from my cable box, somewhere along the path from where the cable enters the cable box to where image gets rendered on the screen, the picture has been converted to 1080p. Period. The cable box could do the conversion, or the TV could. In my case, the TV does it. It performs a deinterlace. It separates the even and odd lines of the pictures, then guess at the missing pixels, then shows you the two frames back to back. What about native 720p content from my cable box? In this case, my cable box is set to upconvert this to a 1080i signal (so my TV isn't always switching modes from channel to channel). How does it do this? Interpolation. It takes the pixels it has, spaces them further apart (with unknown pixels in the middle), then guesses at the unknowns. The 1080i signal gets to the TV, where it is deinterlaced (again by interpolation) to give me my 1080p display. DVDs? Same thing. A regular DVD player outputs 480p. This gets upconverted by my TV to display at 1920x1080.

Wrong Focus in the Consumer Market
So while people are worried about upconverting DVD players giving a better picture, they don't realize that their TVs do the same scaling themselves. What they should be worried about is HOW each device does its interpolation. There are various algorithms for interpolation (zero-order, bilinear, bicubic, all sorts of proprietary adaptive ones based on identifying motion, etc). Consumers should want to know the details of how each one works, and a side by side comparison. This comes up for my regular old DVDs: do I let the PS3 playing the DVD do the scaling/upconverting to 1080p, or do I let my Sony TV? The answer is "whichever one is better at it" but at this point it is impossible to find comparisons such as this available to consumers. You might think that with them both being Sony, they should be the same, but the truth is there is no way of knowing other than side by side comparison. I suspect the PS3 has more raw DSP capability, and my tests confirm that getting the PS3 to do the upconversion gives a visibly better PQ.

The bottom line is this: there is a fundamental idea in information theory that says that no algorithm can recover 100% of missing information for all inputs. So a particular algorithm might do really well for some inputs, but MUST fair horribly for some others. It is all about what devices have the best algorithms for the type of signals we feed them, namely moving pictures. And this is something you have to decide with your own two eyes.

Thursday, August 2, 2007

PS3: recorded HDTV playback update

As opposed to a few days ago, now I know that captured HDTV (MPEG2) playback is a problem with the PS3:
http://www.redkawa.com/forums/showthread.php?t=64
http://www.avforums.com/forums/showthread.php?p=5227297

I'd REALLY like my PS3 to play my recorded HDTV. I'm outraged that they could make such a crappy decoder. Oh well, maybe one day they'll release a decoder that isn't buggy as hell (one can only hope they'll do a multicore/CellBE enabled port of VLC, but this will never happen :-).

In related news, Sony wants me to send in my PS3 for repairs because it won't play MPEG2 correctly. That's right, instead of admitting what is a common problem others are facing, they are accusing my hardware of being faulty. I've sent them several e-mails, even linked to a file demonstrating the problem, and asked them to forward it to a technical person to look at it. The first two rounds of e-mail went like this:
Raj: My MPEG2-PS files aren't playing correctly on my PS3.
Sony: The Playstation only supports (other formats) and MPEG2-PS. Make sure that is what you are playing.
Raj: Yes dumbass, that's what I said. Here is a link to a file for you to test, and for you to debug your MPEG decoder against.
Sony: Sorry, I can't answer that question on e-mail. Please call us.
Of course phone support gets me nowhere (transfered back and forth between SCEA and Sony corporate). Then I get the dreaded "are you using the most updated system software?" I just want to file a bug report, is it that hard!? A valid input file to your decoder isn't rendered properly, so you should fix your decoder. It is that simple. I'm sick of being disappointed with this thing. The only thing keeping me from returning this 380W space heater is Ninja Gaiden, and the promise of buying a Blu-Ray movie or two to test this thing out.

If anyone downloads the offending file from above and tests it on a PS3 vs. on a PC, please leave a comment. It is a VERY brief HD clip from the television series Entourage, and is for debugging purposes only, which I believe constitutes fair use under US copyright law.