You have a shiny new Macbook, and you want to try it out with that 1080p native TV you have. Chances are you have an HDMI input on your TV, and hopefully one that also accepts external audio. This is a little start to finish guide on how to get it all hooked up and working.
The HardwareYou'll need the following:
- Apple mini-DVI to DVI converter dongle
- DVI to HDMI cable
- 3.5mm audio to RCA cable
If you already have an HDMI cable laying around, you can instead get a
DVI-HDMI converter for step two. Luckily DVI and HDMI use the same kind of TMDS video signals/protocol just with different connectors, so this is a nice simple conversion of pinout with the signal not even being altered. And its all digital, so don't too much worry about signal loss through all these connectors.
A Problem Arises...This covers the hardware side. Run the mini-DVI to DVI from your Macbook, plug in the DVI-HDMI cable you have/made into this, then plug the other end into the TV. If you want audio, use the RCA cables from your audio out to the HDMI audio in. You'd think you could plug it into a 1920x1080 native TV and it would "just work" right? Well it doesn't:
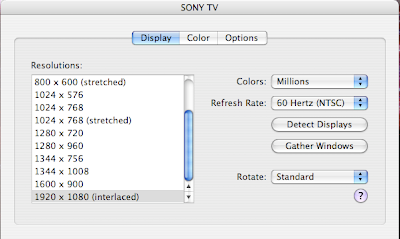
As you can see, the maximum resolution listed in your display preferences is "
1920 X 1080 (interlaced)". There is apparently a little bug in OS X
Leopard Tiger that makes it output 1080i, and no matter how you fiddle with your Sytem Preferences and Display settings, it won't give you 1080p. (Updated 9-26-2008; I mistakenly said Leopard before, I meant Tiger. I think Leopard fixed this issue, not sure though)
The WorkaroundDespite this bug, there is another related bug that makes 1080p work. First, go to System Preferences -> Displays, and check "Show displays in menu bar".
Before
 After
After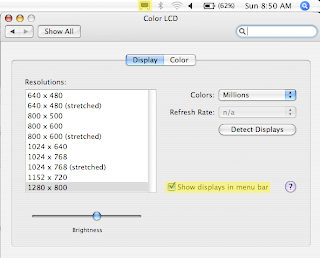
You might or might not have already had this enabled. Then, go to the display settings, and set the external monitor to something else like 1600 x 900, then back to 1920x1080 (interlaced). This has the effect of adding the 1920 x 1080 resolution to your list of recently used resolutions. Note overscan is in this set of menus too, and depending on your TV, you might have to turn it on or off. The TV needs to be set in a 1-to-1 pixel mode too. This is called "Full-pixel Mode" by Sony, it will vary by manufacturer...go through the TV menus to find these settings.
So now check the top Display menu you just enabled: it should have
two options for 1920x1080 on the external monitor with no difference between the two visible in this menu:
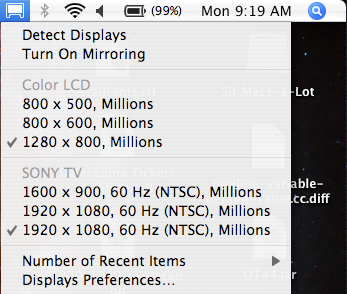
There is however, a difference: one is progressive, the other is interlaced. All you have to do is try the other one, and watch your TV to see when it says it is receiving a 1080p signal. Bingo!
Update 10-15-2007: Increase the number of recent items in this menu if you still don't see the extra item. Thanks to Kristofer from the comments for pointing this out.CaveatsYou might notice some low framerates if you try 1080p trailers and the like. This is because the Macbook (with its RAM sharing Intel GMA 950 graphics chipset) may not be the best powerhouse to deliver full framerate 1080p, so I'd reccommend dual booting into Windows. Why? Because for some reason,
according to Wikipedia, Windows will share up to 224MB of your system RAM for graphics purposes, while OS X will only steal 64MB. So if you have the RAM for it, Windows will do a better playing back some 1080p trailers and whatnot. Enjoy your new monitor :-)


